Software Containers
Containers help to manage software installations and all their dependencies in a single large image. These containers are a self-contained operating system along with any software the container creator added. Containers avoid software conflicts due to versioning as well as OS incompatibility and can be run on most, if not all, operating systems.
The most common container engine is called Docker. Docker is an open-source platform for building, deploying, running, updating, and managing containers and has distributions for Linux, Windows, and Mac. Singularity is another common container engine specialized for use on HPC systems such as Cheaha where Docker cannot be used.
Fantastic Containers and Where to Find Them
Docker containers are available in https://hub.docker.com/. This docker hub repository allows to share containers and use pre-existing docker images.
It is often a good idea to search the Github repo for an application or pipeline to see if a container has already been provided by the authors.
Containers on Cheaha
Using containers on Cheaha bypasses the need to message support to install necessary software. Containers can be downloaded by any user into their personal space and used immediately without admin permission. as mentioned above, you will need to use Singularity containers on Cheaha. You can find all of the Singularity modules using the following command:
It's highly recommended to only use Singularity versions 3+.
Pull Singularity Images
Singularity can pull images from a variety of sources, including Dockerhub, and convert them to the proper format automatically. In order to download an image, use the pull subcommand followed by the output image name and the URI of the image. The general form of the command for pulling from Dockerhub is as follows:
For example, if we wanted to pull the lolcow container:
We now have the lolcow.sif image we can run or share with other researchers. It's important to remember that containers are just independent files that can be moved, copied, or deleted the same as any other file.
Running Singularity Images
There are 3 ways to run Singularity images, all with their unique purposes and are as follows:
singularity run: run a container using a default command set by the author. Generally, this will be used when a container encompasses a full pipeline controlled by a single command. The general form for this command issingularity run <image.sif> [options]where[options]are defined by the default command. You can usesingularity run <image.sif> --helpto see what those options are.singularity exec: run any command available in the container. This provides more flexibility thanrunand would be useful in the cases where a container has more modular components as opposed to a single control script. The general form for this would besingularity exec <image.sif> <command> [options]. You can add the--helpoption to see what a given command does and its inputs.singularity shell: allow interactive use of the container through the terminal. This changes your active environment to that in the container. You can traverse the container's directory tree and search for various files and commands as if it was a virtual machine. This is very useful for interactive development as well as investigation of a container's contents. The general form of the command issingularity shell <image.sif>.
It's important to note that both run and exec enter the container as part of their execution and then exit back to the original shell environment afterwards whereas shell keeps you in the container until you either close the terminal or use the exit command.
Important
singularity shell is not executable via shell scripts. Any singularity commands in a batch script should be run or exec instead.
Singularity Paths
By default, Singularity containers have limited access to the general filesystem. Containers get default access to the /home directory as well as the directory the container was run from. If you run the container from $HOME but try to access files in $USER_DATA, you will see an error. In order to give a container access to other directories, use the -B or --bind option when invoking the container. For instance, if I wanted to use run on a container that had an input option called -i and give the container access to a subfolder called my_data in a project space called UABRC, the singularity command would look like:
You can also alias the bind path to a shorter name and use it in the command. In that case, the bind option would look like --bind </directory_path>:</alias>. For example, if I was running a container and was giving the my_data directory as an input, I could alias it to /input_data and use it in the command like so:
These bind paths can be used in both exec and shell subcommands as well.
Note
Bind paths cannot grant access to folders and files your account does not have access to. For instance, you cannot use a container to access data in another user's account unless that user has explicitly given you the correct permissions via chmod or ACLs.
Using Containers on UAB RC Cloud (cloud.rc.uab.edu)
To access docker containers, install Docker in your system. To install docker desktop on your computer, follow this link: Docker Desktop Page.
Docker Installation on UAB RC Cloud
Following are the installation instructions to install Docker on UAB RC Cloud with Ubuntu operating system. Tested the installation on Ubuntu 20.04. Setting up UAB RC Cloud account can be found in UAB RC Cloud.
Using a Docker Container from DockerHub
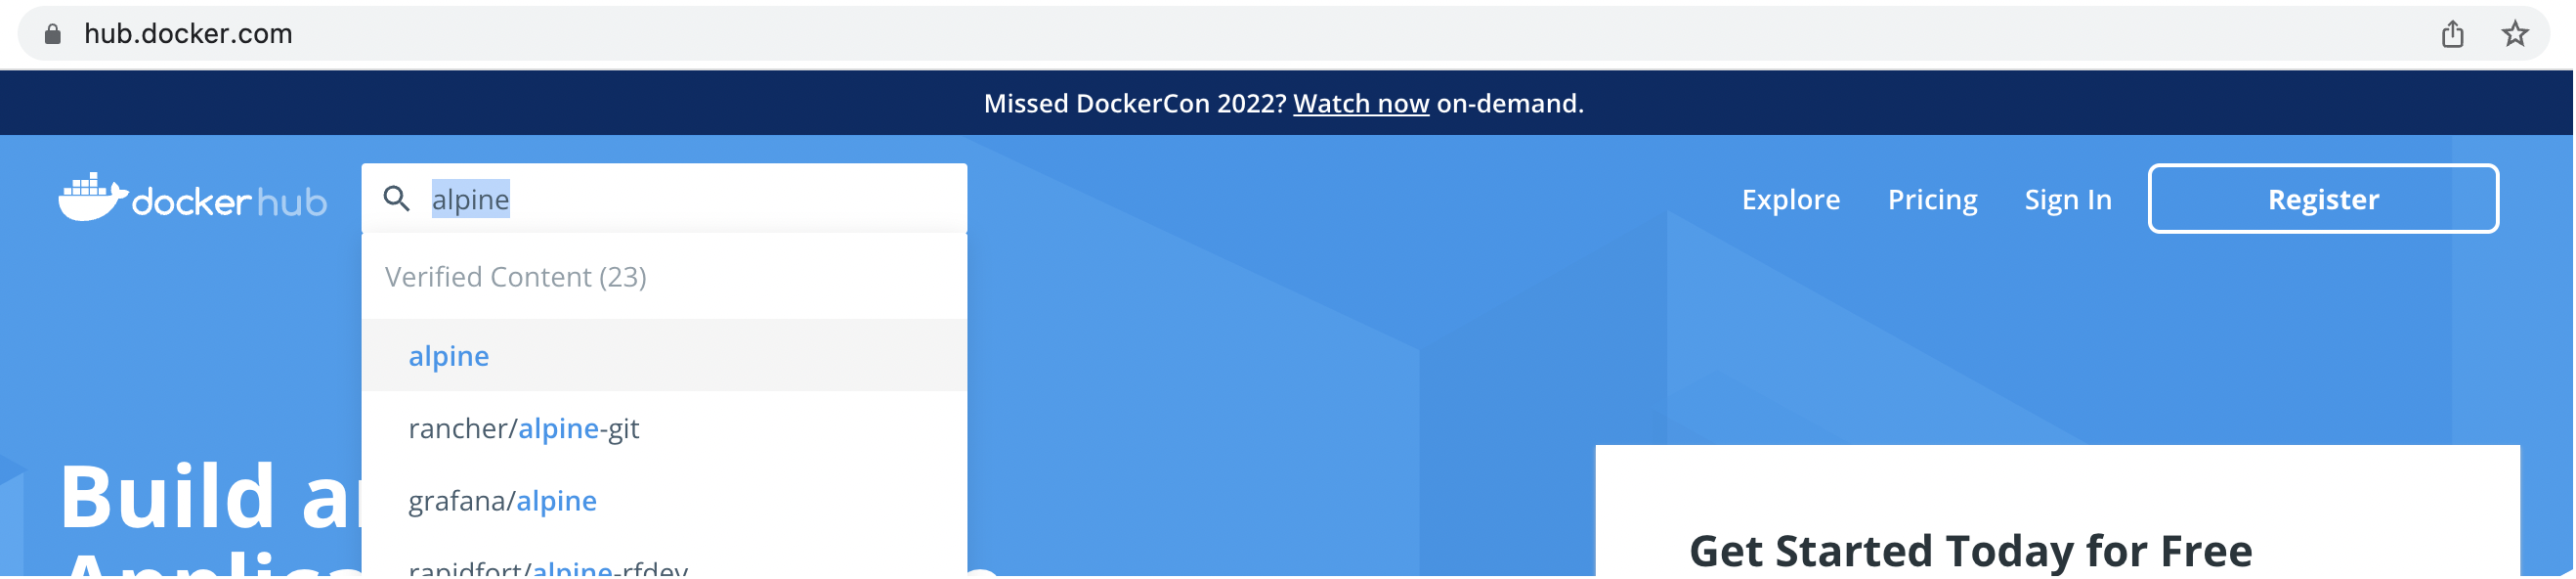
We can start pulling a container named alpine from the Docker hub. alpine is a general-purpose Linux distribution. Look for the container alpine in the docker hub, copy the pull command, and paste it into your terminal.
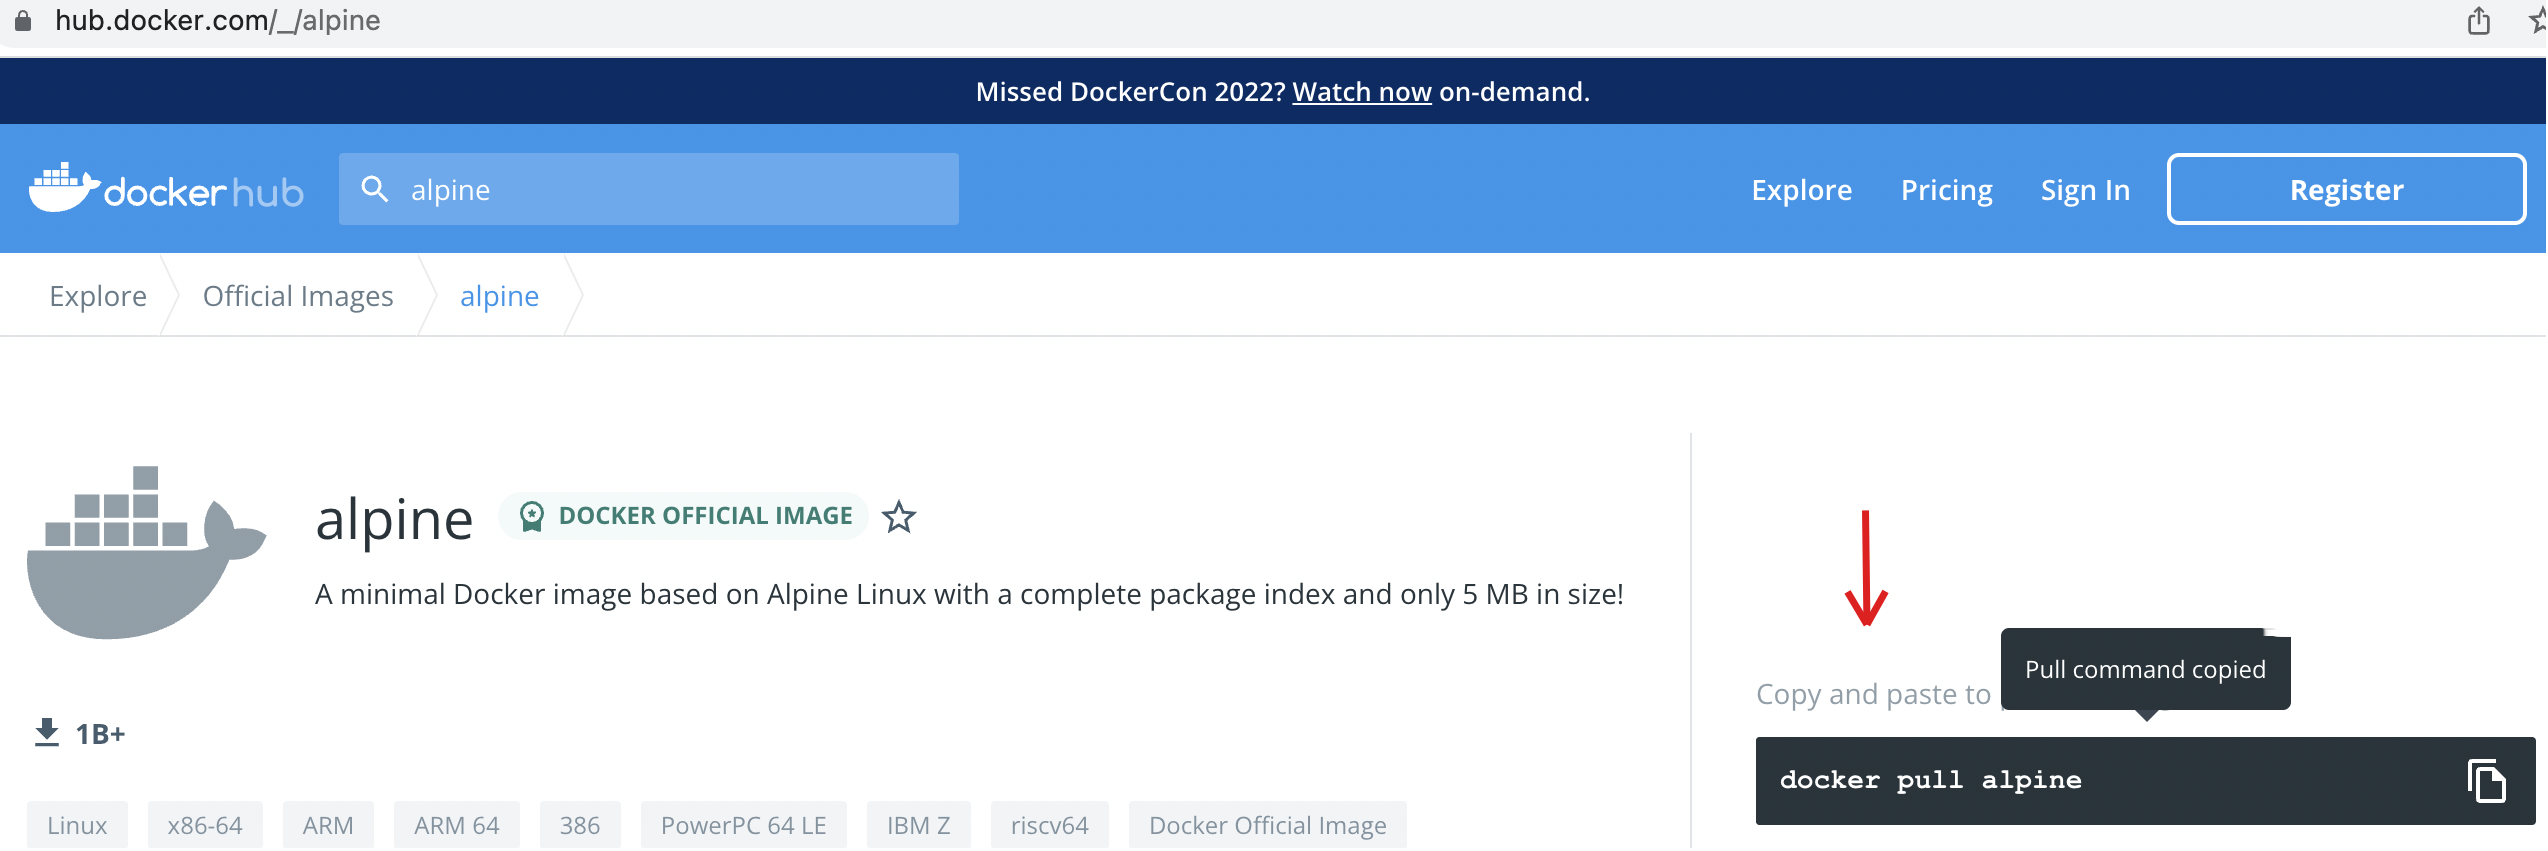

Once the image is pulled, you can verify if the image exists using the below command. Note that if you do not specify the tag/version of the container, the recent version is built, and the tag is listed as latest.

If you prefer to pull a particular version of the alpine container, you need to mention the tag details in your pull command. You can see the available tags/versions of alpine from the Docker hub.
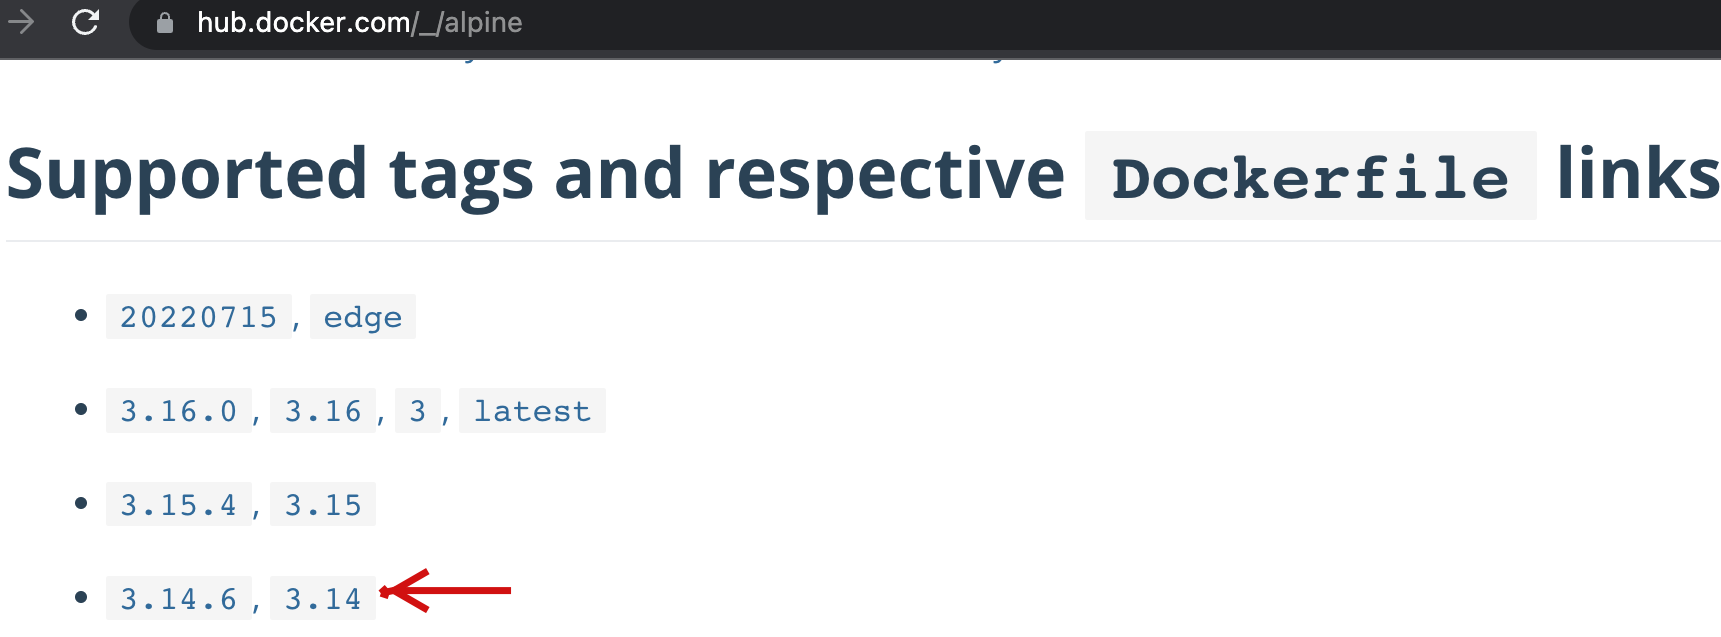
To pull particular version of alpine container, use the below syntax.
Here the container_name is alpine, and the tag is 3.14.
The existing image looks like,

Create Your Own Docker Container
You can create your own Docker container, build it, and upload/share them in the Docker hub or UAB GitLab container registry.
Let us take a synthetic python code and formulate the packages/dependencies required to build your software container. Below is a python script that requires packages, namely, numpy, scipy, and matplotlib. Next, the steps to create a Dockerfile is illustrated. Let us name this script python_test.py.
import numpy as np
import matplotlib
import pylab
import matplotlib.pylab as plt
import scipy.integrate as integrate

a = np.array([0, 10, 20, 30, 40])
print(a)

b = np.arange(-5, 5, 0.5)
print(b)

t = np.arange(0,20.5,0.5)
print(t)

result = integrate.quad(np.sin, 0, np.pi)
print(result)

plt.plot([1, 2, 3, 4], [1, 4, 9, 16])
plt.show()
plt.savefig('testing.png')
Create a Dockerfile that has Miniconda Installed
We require numpy, scipy, and matplotlib libraries to execute the above Python script. Following are the steps to create a specification file and build a container image.
-
Create an empty directory
miniconda. -
Create a
Dockerfilewithin theminicondadirectory with the following contents. The file nameDockerfileis case-sensitive.
# You may start with a base image
# Always use a specific tag like "4.10.3", never "latest"!
# The version referenced by "latest" can change, so the build will be
# more stable when building from a specific version tag.
FROM continuumio/miniconda3:4.12.0

# Use RUN to execute commands inside the miniconda image
RUN conda install -y numpy">=1.16.5, <1.23.0"

# RUN multiple commands together
# Last two lines are cleaning out the local repository and removing the state
# information for installed package
RUN apt-get update \
&& conda install -y scipy=1.7.3 \
&& conda install -y matplotlib=3.5.1 \
&& apt-get --yes clean \
&& rm -rf /var/lib/apt/lists/*
This is the specification file. It provides Docker with the software information, and versions, it needs to build our new container. See the Docker Container documentation for more information https://docs.docker.com/engine/reference/builder/.
In the Dockerfile, we start with an existing container
continuumio/miniconda3:4.12.0. This container is obtained from Dockerhub; here,continuumiois the producer, and the repo name iscontinuumio/miniconda3.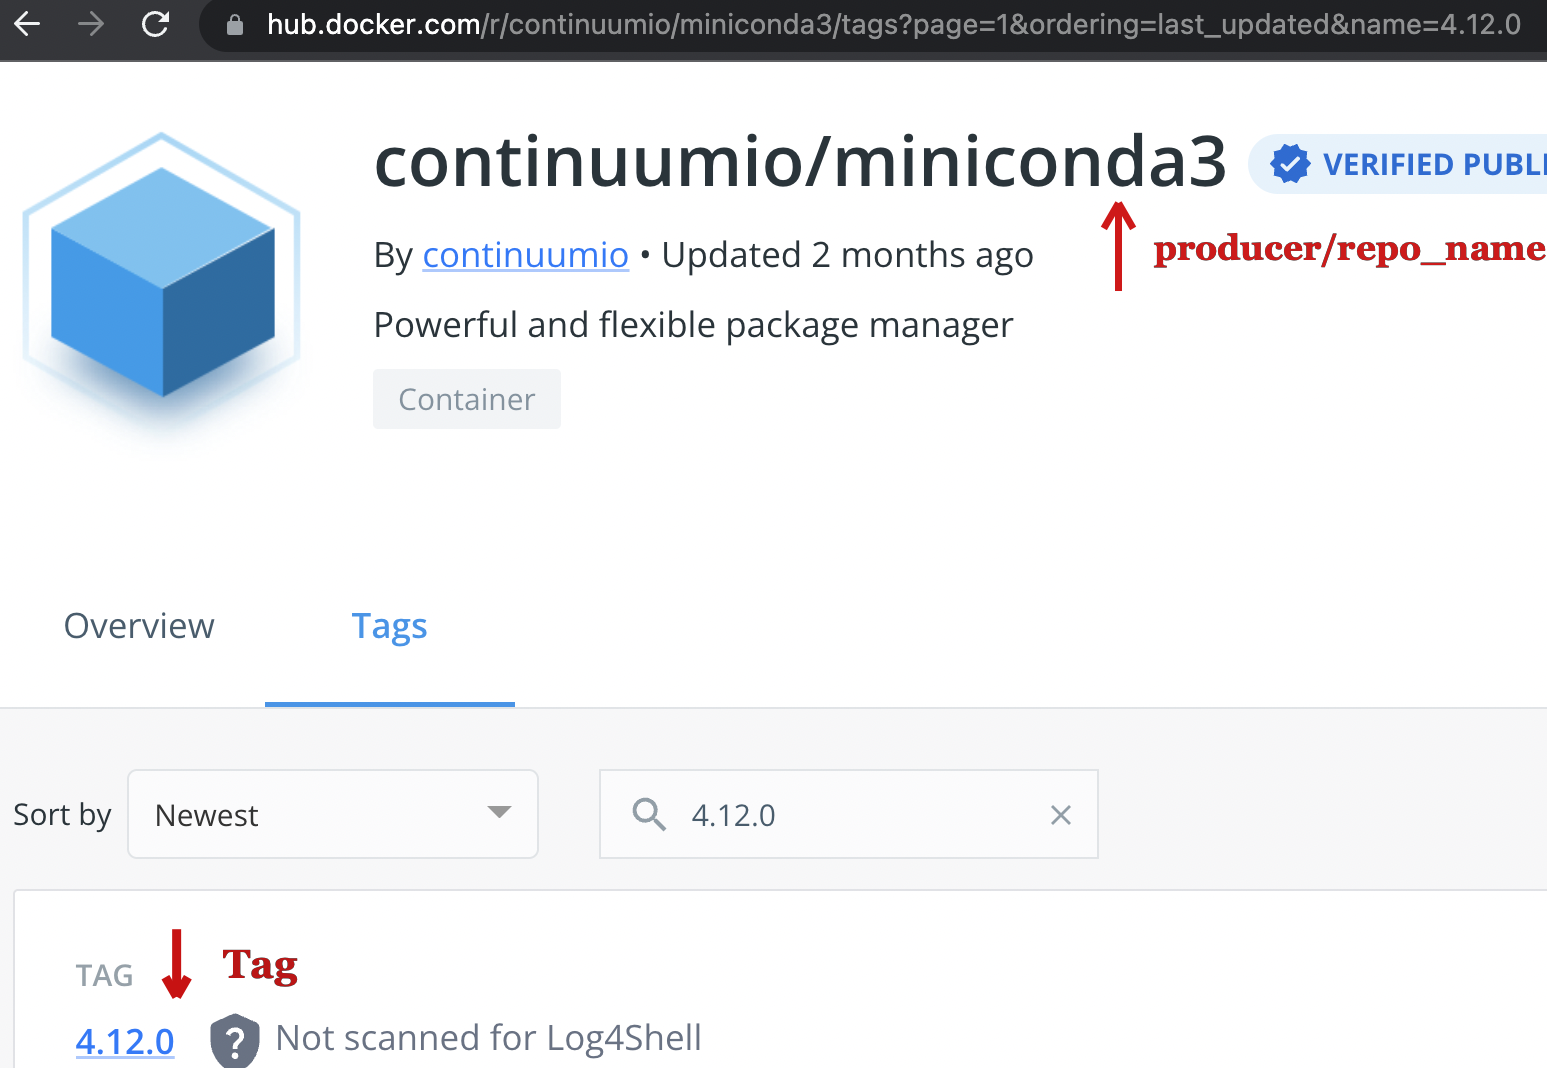
You may specify the required version from the
Taglist. Here the tag/version is4.12.0. Also its a very good practice to specify the version of packages for numpy, scipy, and matplotlib for better reproducibility.Containers and Reproducibiliy
Always include version numbers for Anaconda, package managers, software you are installing, and the dependencies for those software. Containers are not by nature scientifically reproducible, but if you include versions for as much software in the container as possible, they can be reproducible years later.
-
To build your container, change the directory to
minicondaand use the below syntax to build theDockerfile. Here we use.to say "current directory." This will only work if you are in the directory with theDockerfile.Here the repository_name is
py3-minicondaand the tag is2022-08.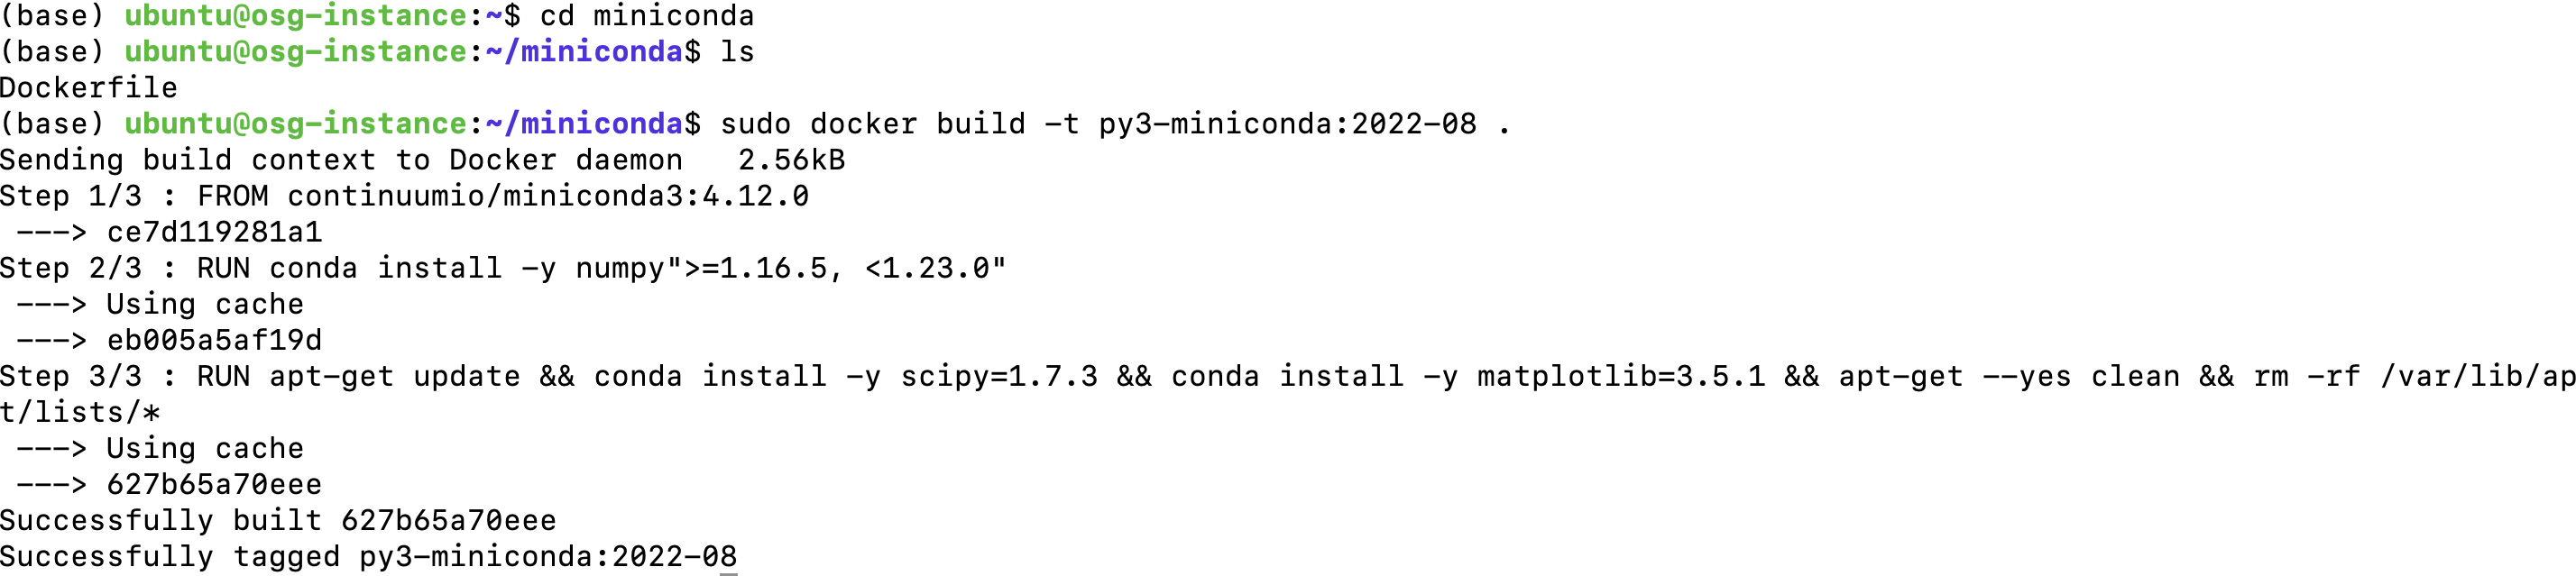
Note
The . at the end of the command! This indicates that we're using the current directory as our build environment, including the Dockerfile inside. Also, you may rename the repository_name and tag as you prefer.

Running the Built Miniconda Docker Container Interactively
To run docker interactively and execute commands inside the container, use the below syntax. Here run executes the command in a new container, and -it starts an interactive shell inside the container. After executing this command, the command prompt will change and move into the bash shell.
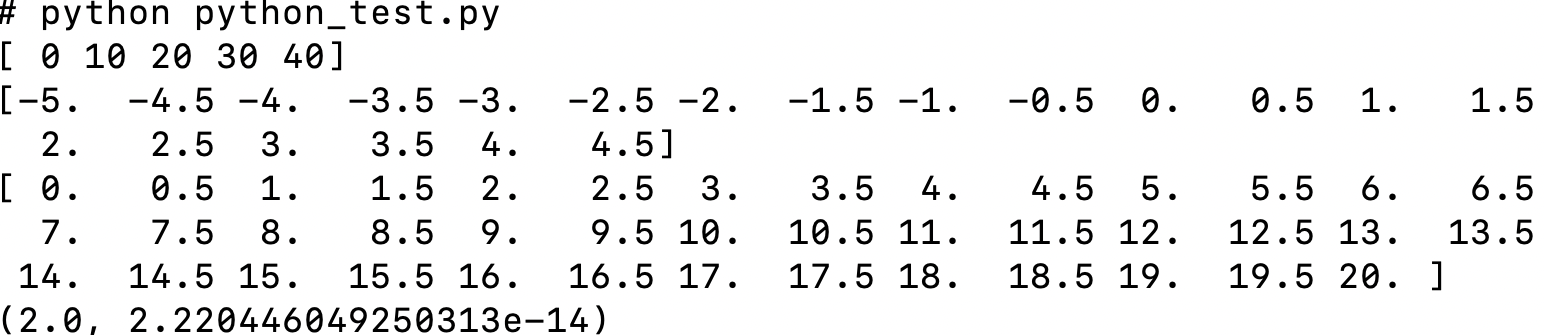
To execute your container py3-miniconda interactively, run this command with the tag `2022-08'.
The python executables to execute our synthetic python script are within the directory structure /opt/conda/bin.


Mounting Data Onto a Container
Before we mount data onto a container, remember you initially created the python script python_test.py when creating your own container. Move python_test.py within miniconda directory. Now you have your miniconda/python_test.py outside the container. To access the files outside the container you should mount the file path along with the docker run command.

To mount a host directory into your docker container, use the -v flag.
So the command for our example will be,
Here we are mounting the $HOME directory /home/ubuntu from a host into containers' $HOME directory. Note that you may mount a particular directory according to your preference. The following shows the list of files in containers' $HOME directory with and without mounting.
Before mounting, there are no files found within the $HOME directory.

After mounting using -v flag, files show up within the $HOME directory. The highlighted miniconda is our working directory with python script.

We can now execute the script, python_test.py using this command.
More lessons on Docker can be found in this link: Introduction to Docker and Docker Documentation.
Sharing Containers Using UAB GitLab Container Registry
If you prefer to share your container with a particular team/group, then the UAB GitLab container registry is the best and most secure option.
The following steps help you to create a container registry in UAB GitLab:
- Create a UAB Gitlab account following the guidelines from the UAB GitLab page.
-
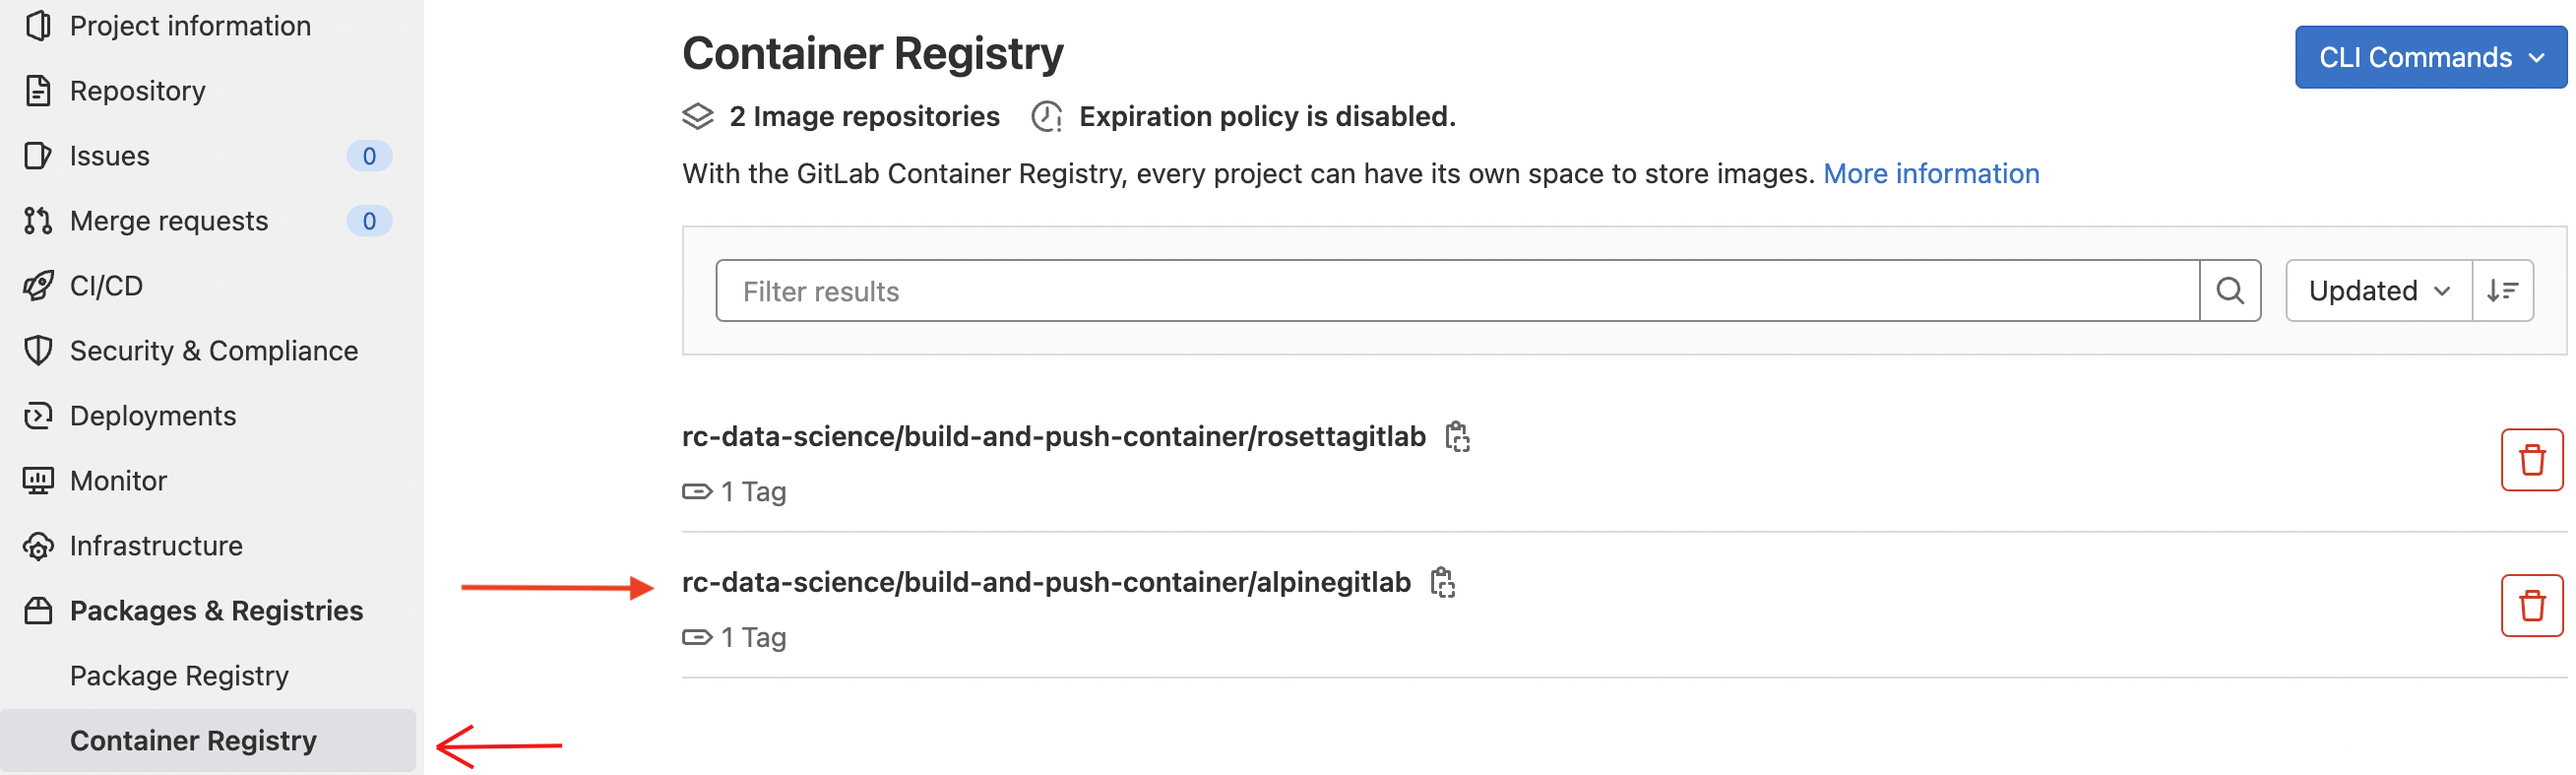
Create a
new_projecton UAB GitLab and clickPackage and Registries, and then go toContainer Registry. Initially, the container registry looks empty because there are no container images in the registry.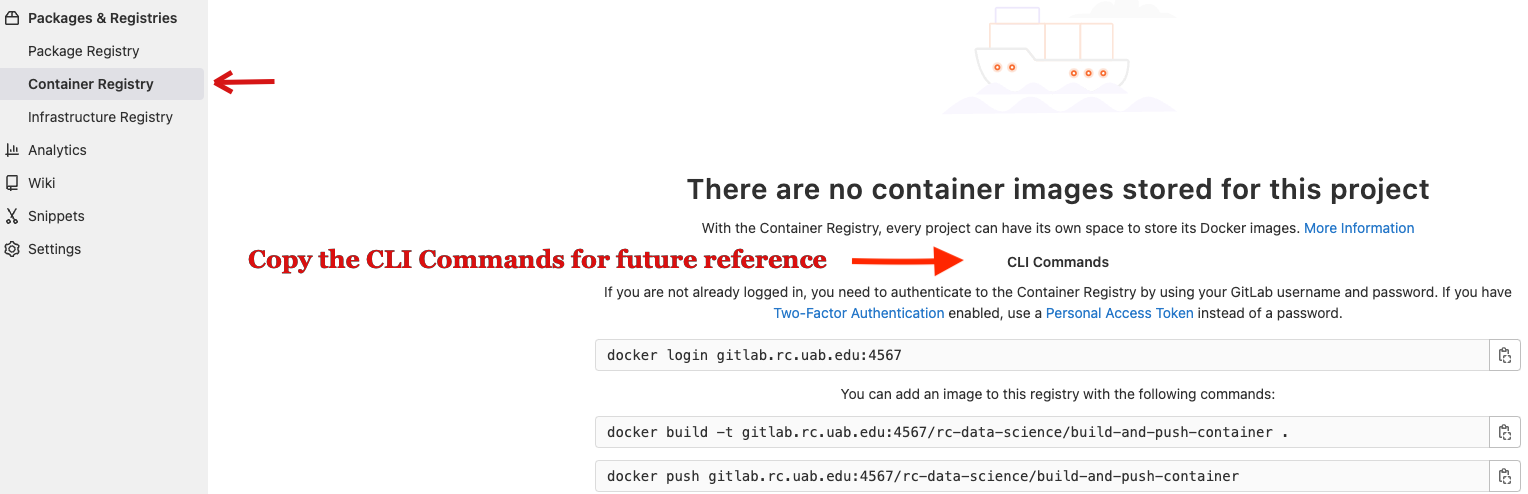
Note
Copy these CLI commands for future reference. It contains commands (1) to login to your project UAB GitLab container registry (2) Add an image to the registry using the push/build command. We will use the
pushcommand as we already have the existing container in our system. -
Login to UAB GitLab Registry using your
registry_name:ID.Note
The registry_name and ID shown in this examples are for understanding and not meant for testing. Please use your GitLab registry name and ID for testing.
Note: For securing concerns, use an access token to log in. Create an access token in UAB GitLab to push/pull the docker container in the container registry (Secure token and guidelines to follow are shown next).
-
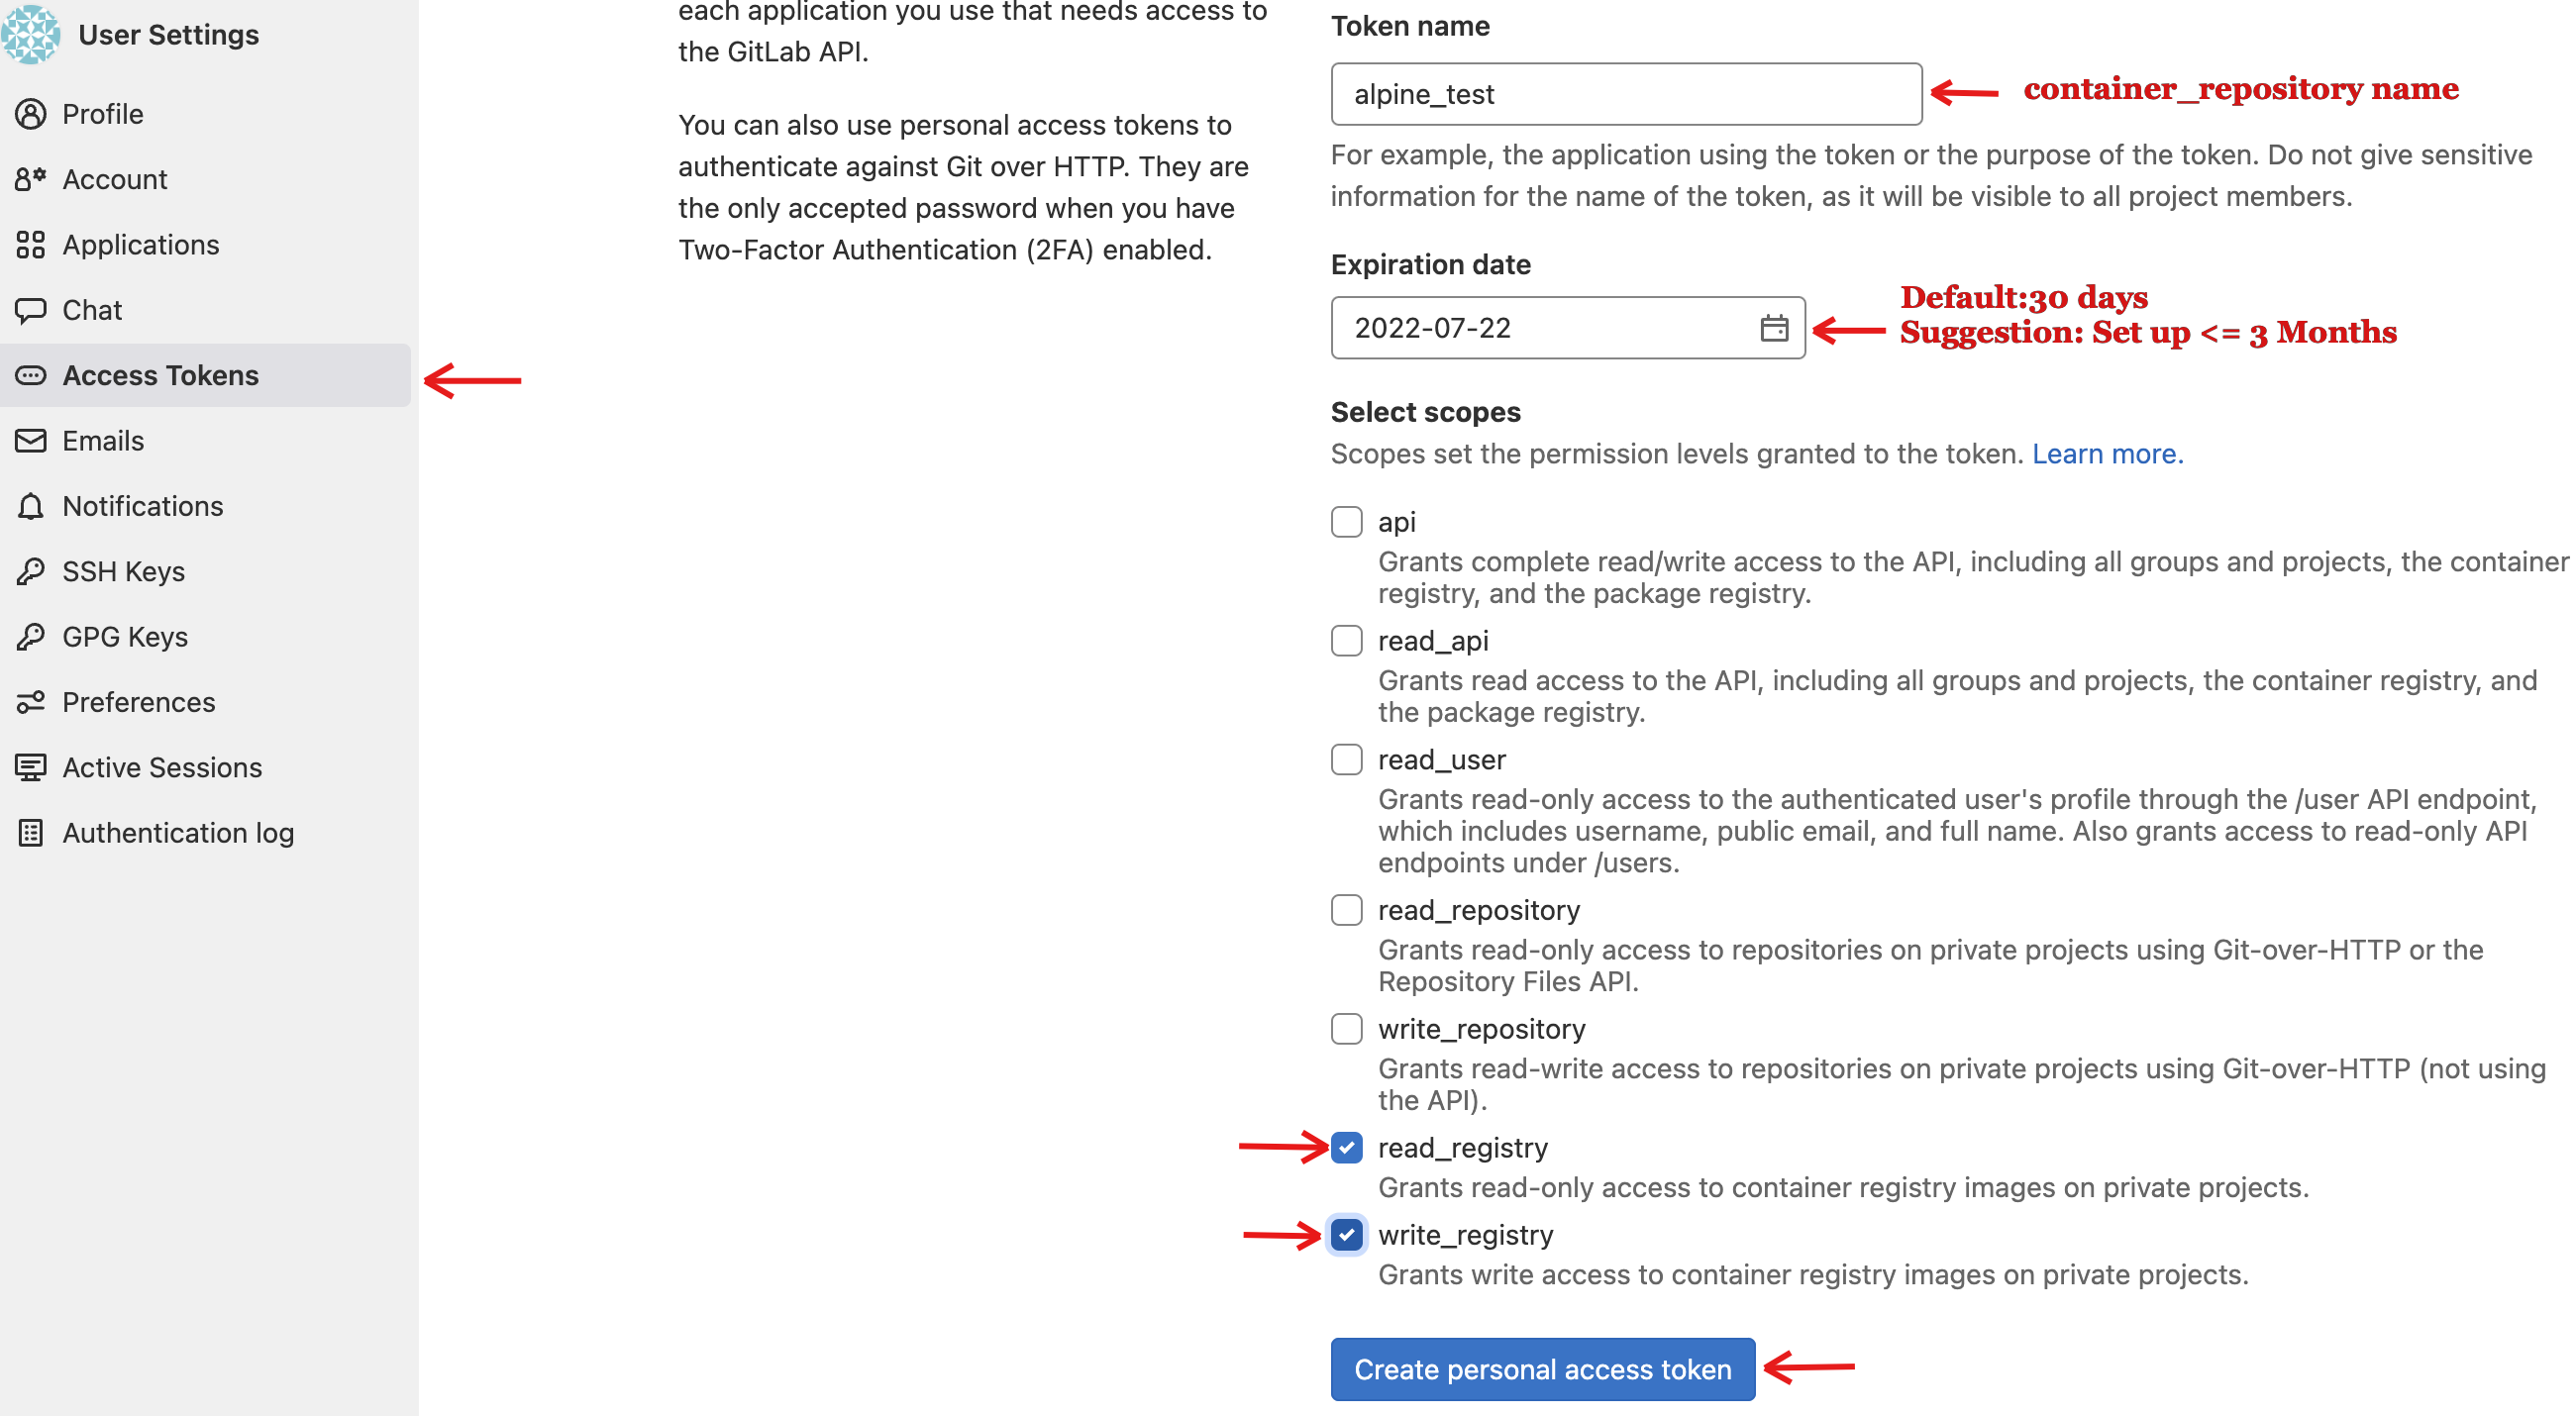
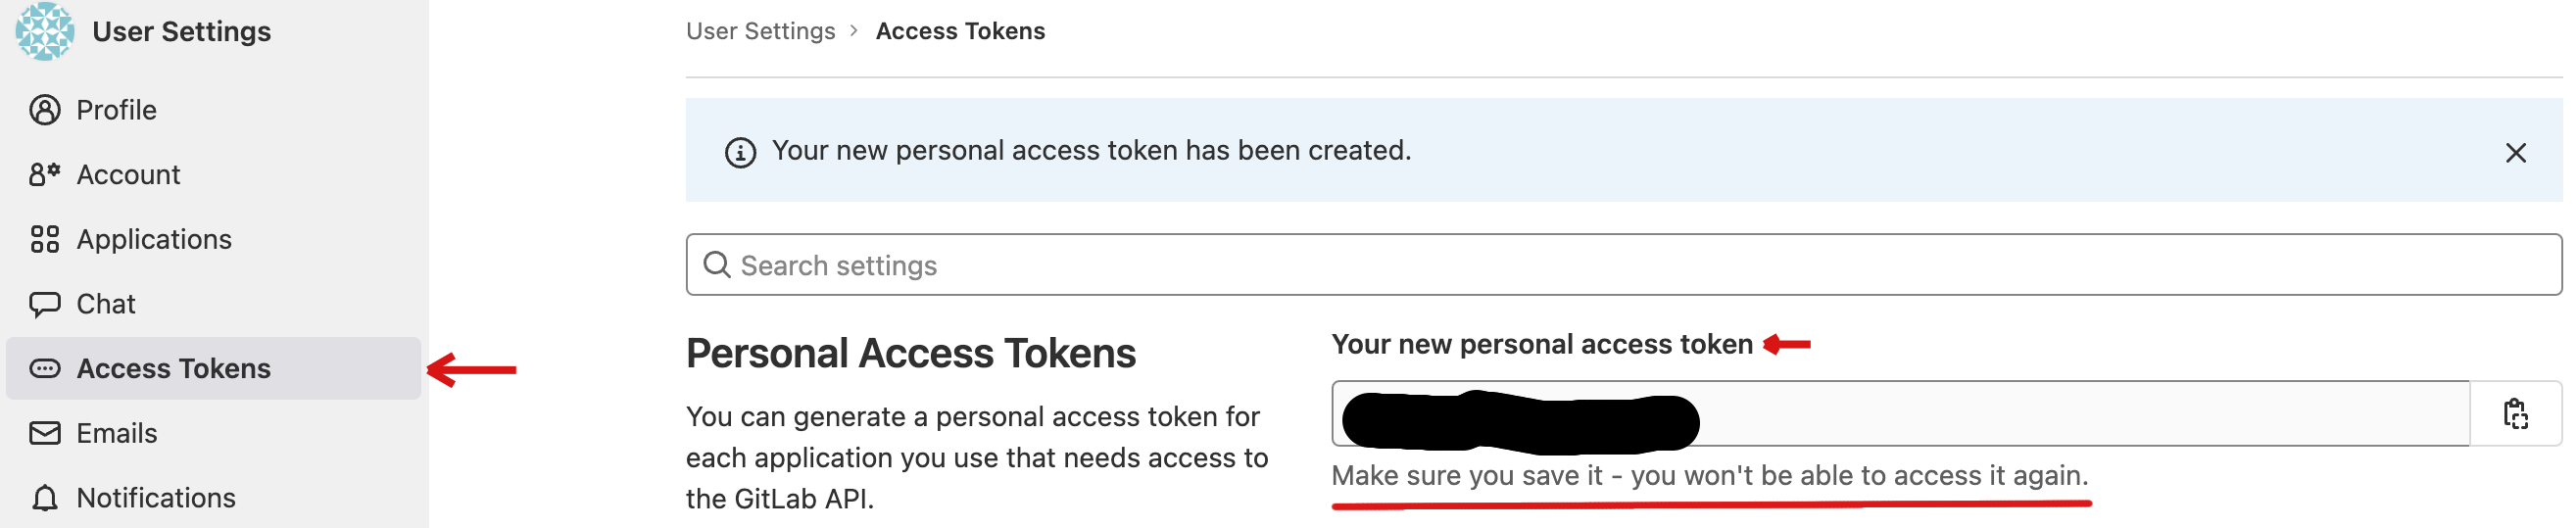
Creating an Access Token: From the UAB GitLab page, you can create an access token instead of using a password to log in to the UAB GitLab registry. Goto Edit profile -> Click
Access Tokens. Then enter:-
Token name.:Suggestion: "container"_"repository-name"
-
Expiry date. Suggestion: Default is 30 days. You can set your expiry date 3 months from the date you are making it.
-
Under select scopes, check read and write registry (to push images to the registry) -> Then click
create personal access token.
-
Once you create the token, copy the new personal access token since it’s a one-time step and hard to retrieve after a refresh. Use the personal access token for login.

Warning
Running docker login leads to a warning message that your password is stored unencrypted in /root/.docker/config.json (or) $HOME/.docker/config.json. To ignore this warning, follow the instructions in this Github page or the Docker credentials store page.
Push Alpine Container from your System to UAB GitLab Container Registry
- List the docker images on your local computer using the
docker imagescommand. Analpineimage exists already on this computer. Your container will likely have a different name.

- Tag
alpineto push into UAB GitLab registry. We need to have the UAB GitLab registry name to push. It will show the default command on the container registry page. Copy these commands for future reference. The tag istesthere.
sudo docker tag alpine:latest gitlab.rc.uab.edu:4567/rc-data-science/build-and-push-container/alpinegitlab:test
You can see the tag test associated with the alpine image.

The below first command is the syntax to push the Docker image to the UAB GitLab container registry from your computer. The second command is an example of pushing a Docker image to the UAB GitLab container registry from your computer.
Note
The registry_name,ID, and gitlab_group_name shown in this examples are for understanding and not meant for testing. Please use your GitLab registry name and ID for testing.
sudo docker push gitlab_registry_name:ID/gitlab_group_name/project_name:tag

sudo docker push gitlab.rc.uab.edu:4567/rc-data-science/build-and-push-container/alpinegitlab:test

In your GitLab's page container registry, refresh to view the alpine container is pushed to the registry.
Now lets pull the alpine container from GitLab's page container registry to your system. Before that, remove the previous image from the system, which already has a test tag, to avoid discrepancies.

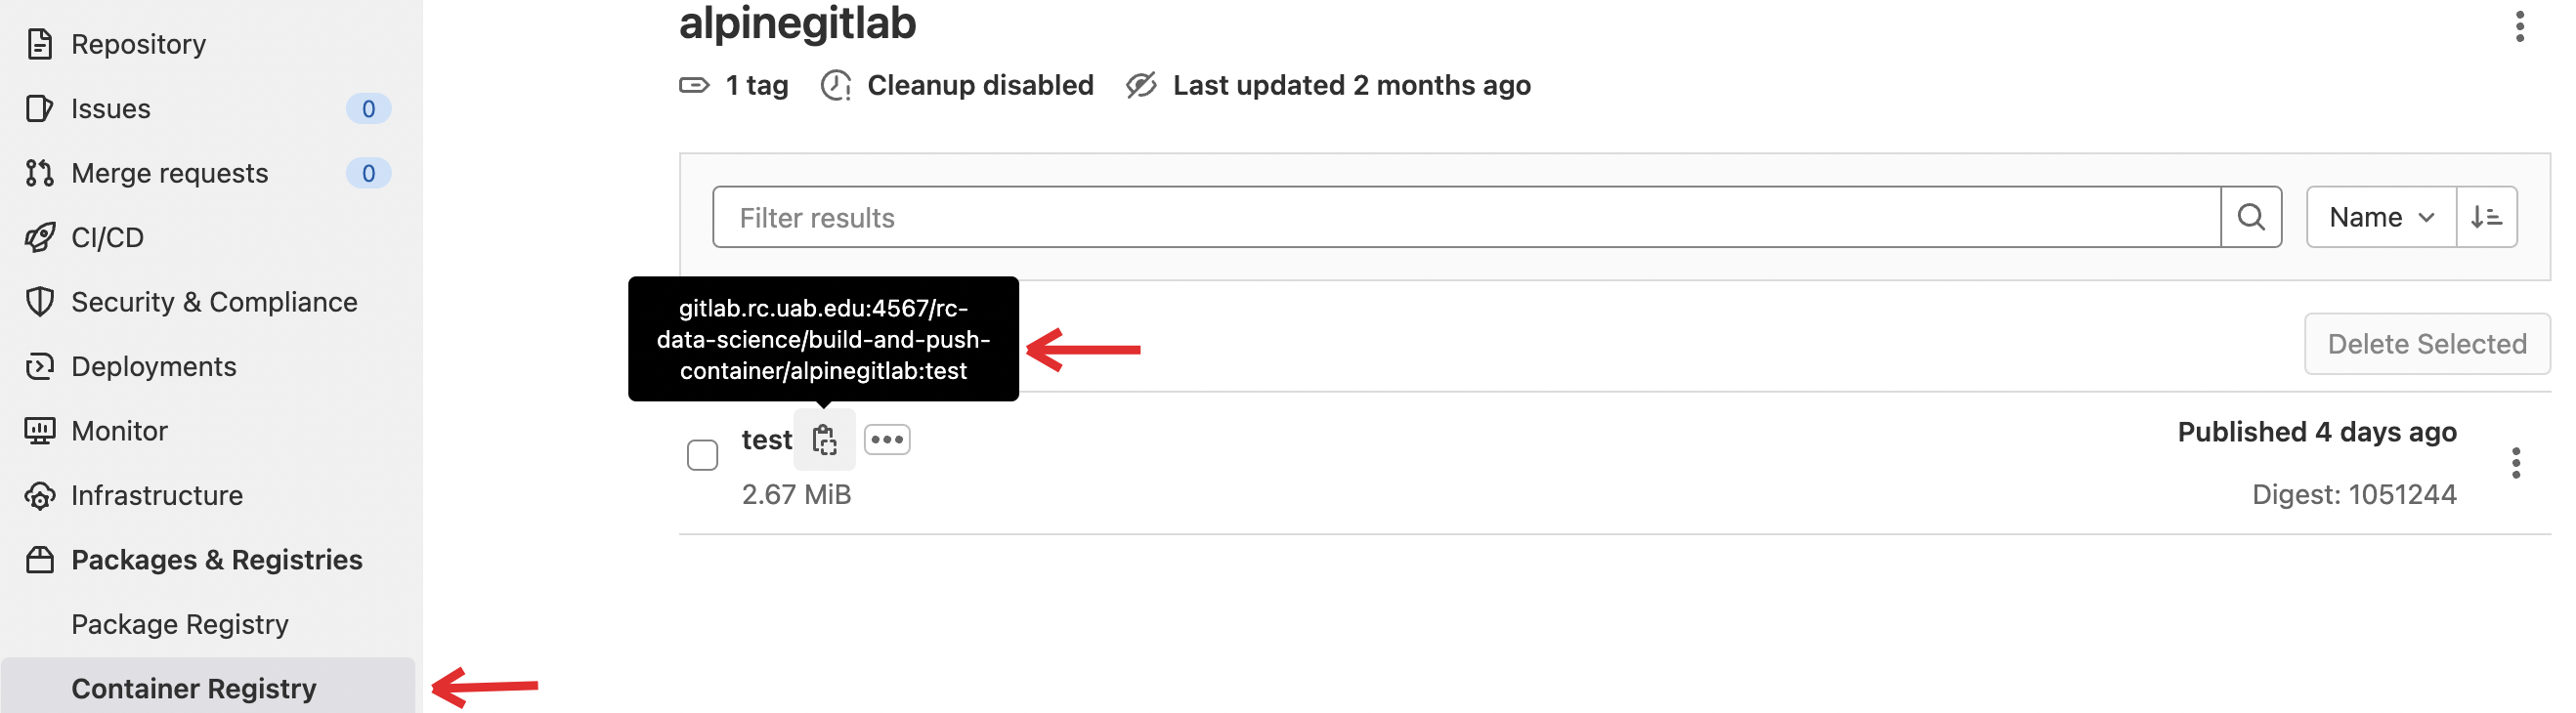
In your GitLab's page container registry, copy the pull command from the test container registry, and use it to pull the docker container to your system. You can see the image is reflected in the image list.

