LTS Core Data Management Plans
UAB Core Facilities provide access to research instruments and services for scientific and clinical investigators. Cores can generate large amounts of data very quickly for many labs and so have some unique data management concerns. These concerns can be summarized as follows:
- Data transfer off local machines
- Data organization
- Data distribution
UAB Cores can request a 75 TB allocation on LTS with possibilities for expansion to use for both storage and distribution of data. Together with Globus and CLI tools for transfer, LTS can be the basis for a full core data management plan. This documentation aims to provide details of general solutions for common problems with managing large amounts of data in a core.
Specifics of Core LTS Accounts
Core LTS accounts behave the same as lab LTS accounts. The base allocation is 75 TB across 100 buckets with possibilities for expansion over time based on the needs of the core. The account will be a separate entity that owns its own buckets and data. Either the director data manager of the core will own the credentials for the core account and so will receive a set of access and secret keys separate from their personal and lab keys.
Warning
Do not share these keys with anyone. A person with core LTS keys have essentially admin access on all data stored in core buckets. This allows them to change who can access data as well as delete any and all data in the core LTS account.
Data Organization
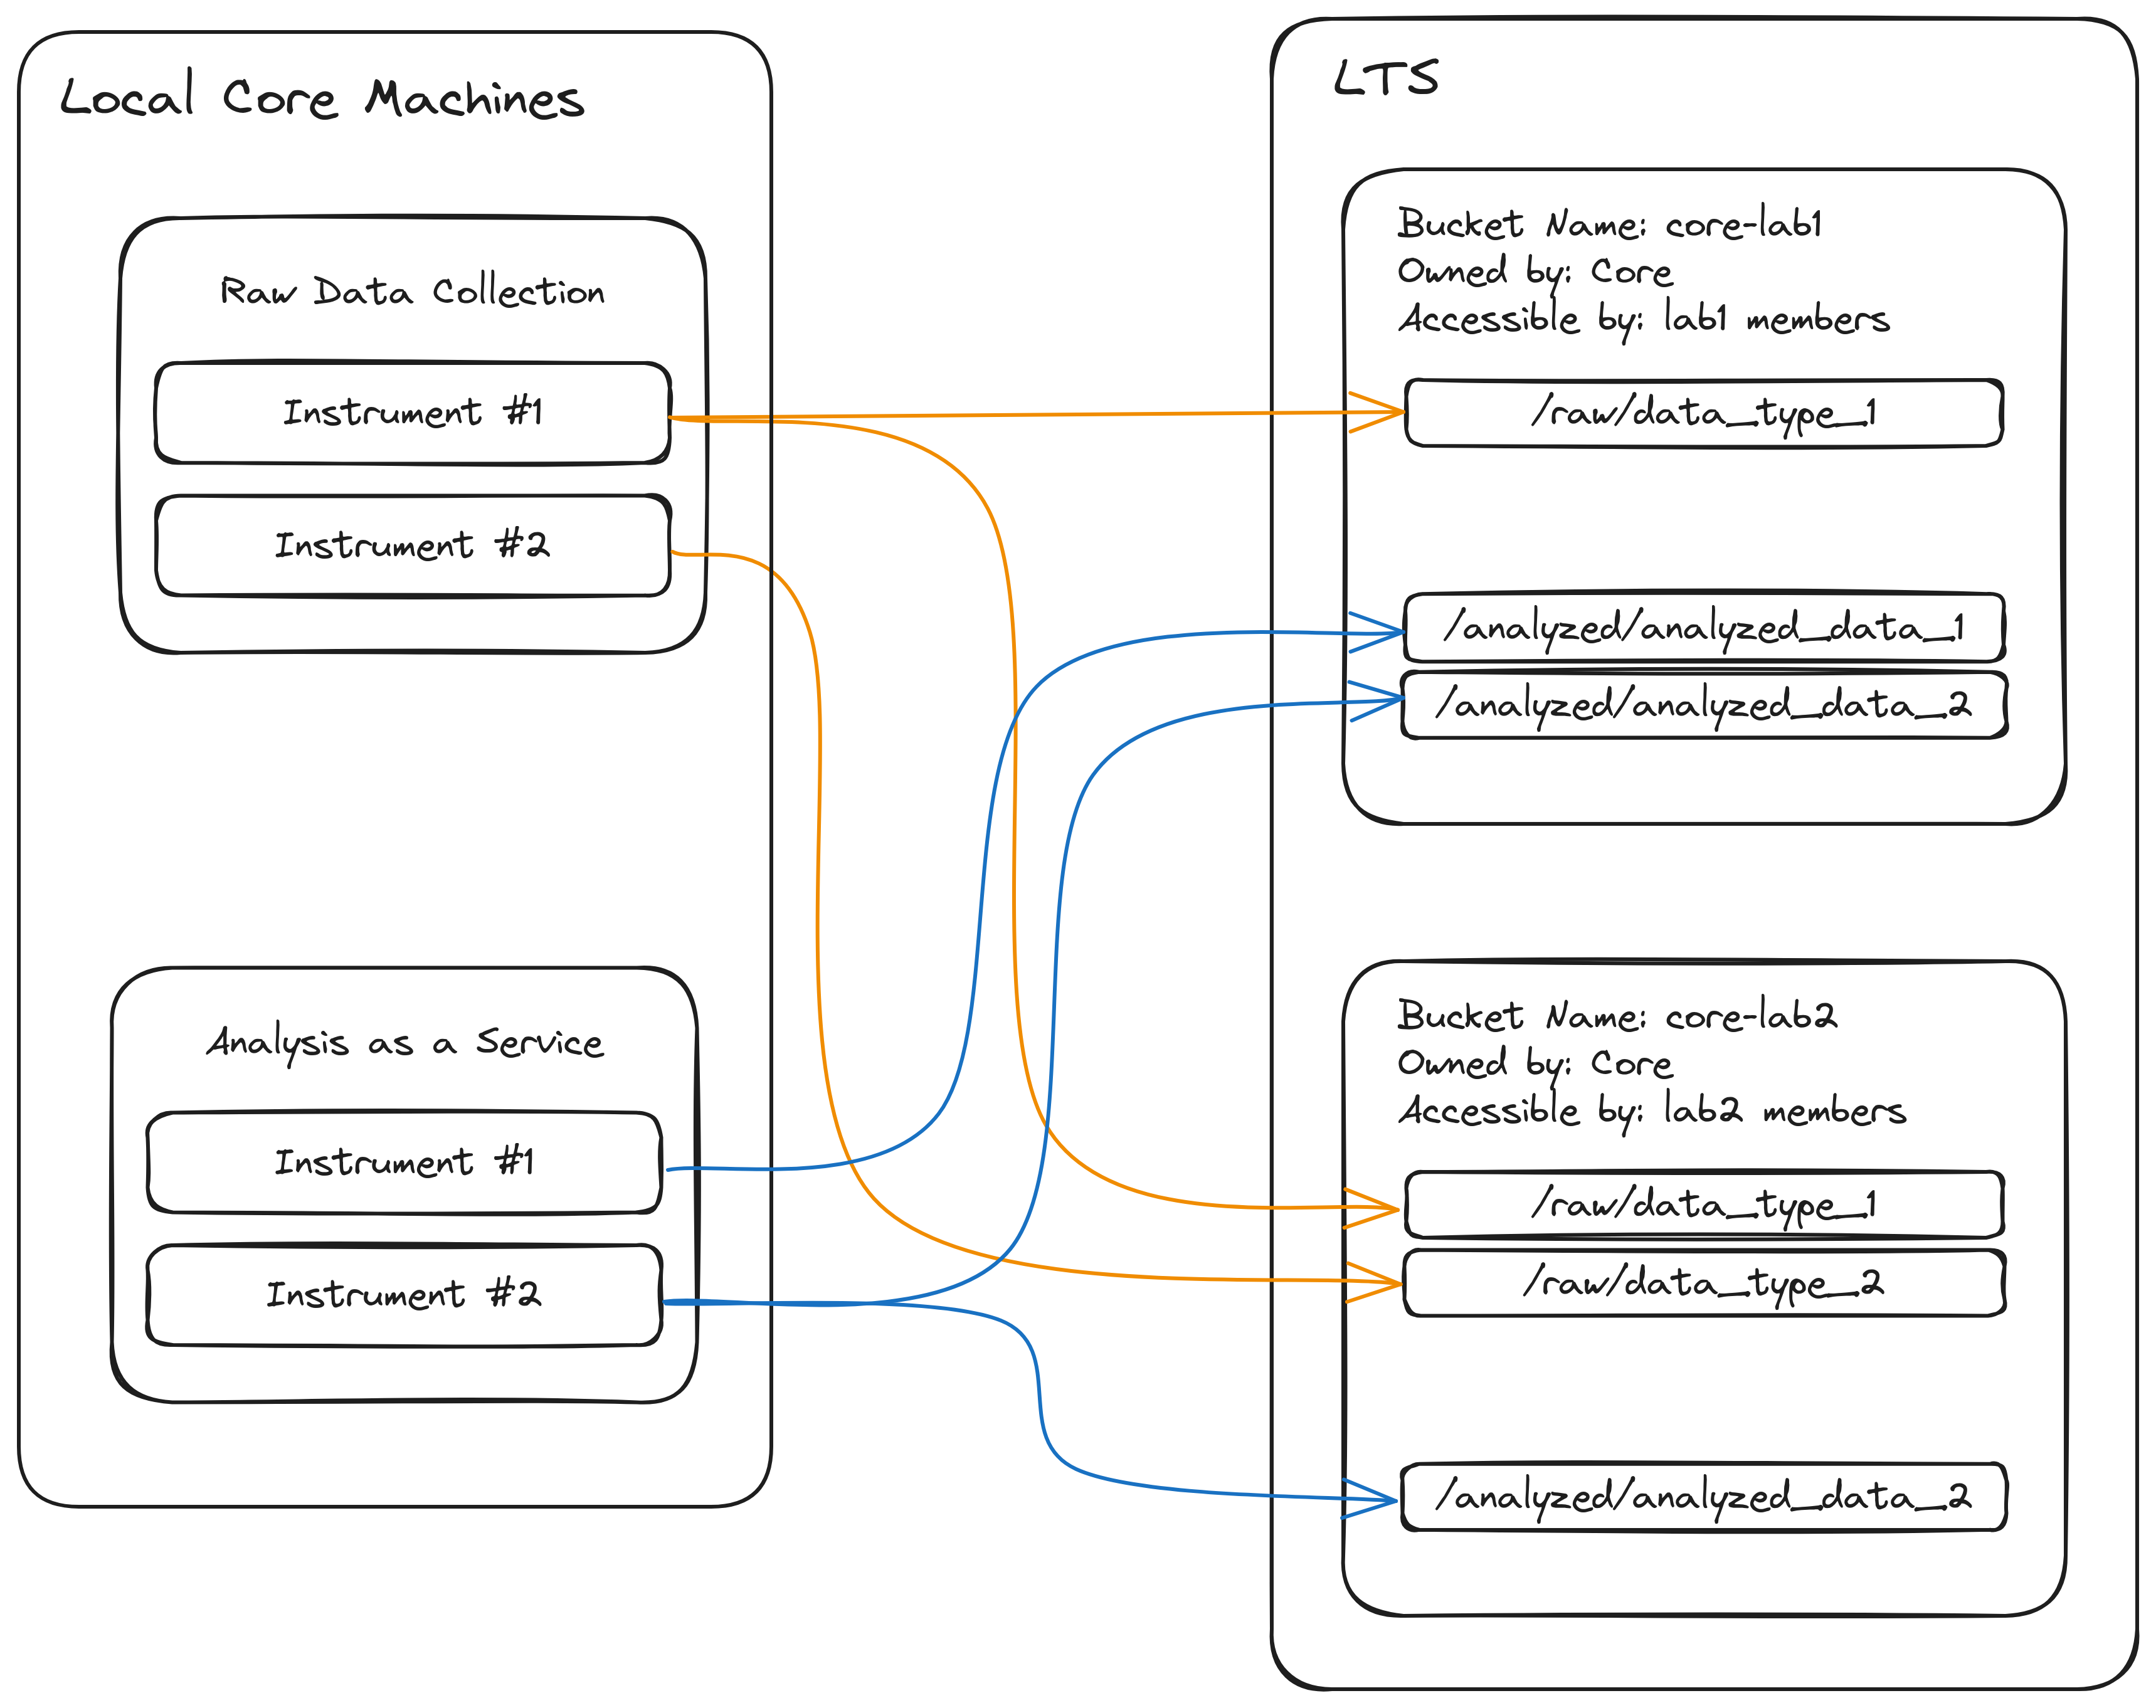
Effectively organizing an LTS space will dictate where data are transferred within it. The suggested storage structure can be summarized as follows:
- The core creates a bucket for each lab or group it services containing raw or analyzed data for that group. Permissions for each bucket are managed independently.
- Due to all buckets in LTS needing to have unique names, buckets should be named more descriptively than just the name of the group to which the data belong. Instead, the format
[core_name]-[group_name]will be both specific and unique enough to work in most circumstances. For example, data analyzed by the Research MRI Core (RMRIC) core for groupsmithlabwould be put in a bucket namedrmric-smithlab. Keep in mind the allowed characters when creating bucket names.
- Due to all buckets in LTS needing to have unique names, buckets should be named more descriptively than just the name of the group to which the data belong. Instead, the format
- Within each bucket, data are generally organized by classification as raw or analyzed and then further organized by type of data or analysis. The exact form this takes is left up to the core itself. This style of organization lends itself to both structural clarity and automation of data transfer.
A simplified diagram illustrating this organization can be seen below.
Due to data sensitivity, we advise against storing data from different groups in the same bucket. Managing permissions for a bucket where many groups can only access specific portions of a bucket is cumbersome and prone to error. Instead, separate policy files should be kept for each bucket specifying which researchers from each lab or group should be able to access the stored data. These policy files can be kept in a single location owned by the core for future modification. This also facilitates future transfer of bucket ownership from the core to the lab or group to whom the data belongs after data collection or analysis is complete.
Transferring From Local Machines to LTS
The details concerning data transfer from core instruments and analysis machines can differ drastically across cores. For cores where all data are transferred from a single machine or server to LTS, a single installation of Globus Connect Personal or Globus Connect Server would be satisfactory for uploading data to LTS.
Warning
Do not set up transfers from machines that core customers will have access to. This creates opportunities for researchers to access data they are not authorized for. Data collected by the core should only be accessible by core personnel until those data are distributed to their respective labs.
For situations where data either needs to be transferred from multiple machines to LTS. please contact Research Computing for a consultation.
Distributing to Data Owners
While uploading and/or managing data for other groups, data in any buckets the core owns will count against the quota for the core. Data will need to be distributed in some way to the groups who own the data to free up storage in the core's account once those data have been fully collected or analyzed. It is not currently possible to directly the change the owner of a bucket without submitting a ticket to research computing, however it is possible to set permissions on a bucket to allow the data owners to copy the data to a new bucket under their ownership. Once the data are copied, the original bucket can be moved onto a physical disc as an archive or deleted.
Permission to copy data is granted via a policy file. Policy files can be customized extensively, but a general file can be seen below.
{
    "Version": "2012-10-17",
    "Statement": [
    {
        "Sid": "lab-permissions",
        "Effect": "Allow",
        "Principal": {
            "AWS": [
                "arn:aws:iam:::user/lab-group"
            ]
        },
        "Action": [
            "s3:ListBucket",
            "s3:GetObject"
        ],
        "Resource": [
            "arn:aws:s3:::core-bucket",
            "arn:aws:s3:::core-bucket/*"
        ]
    }]
}
This policy file allows the lab-group LTS account permission to list and copy all objects in the bucket. Data should typically only be copied from a core bucket to a lab bucket, not to a specific individual's bucket. The owner of lab-group will need to initiate the transfer. General commands for creating a bucket and transferring data to it can be found below for convenience. These commands use s5cmd for transfer and assume the credentials used are for the lab-group.
# Create a new bucket to hold the data
s5cmd --endpoint-url https://s3.lts.rc.uab.edu mb s3://destination-bucket

# Copy files from core bucket to lab bucket
s5cmd --endpoint-url https://s3.lts.rc.uab.edu --numworkers 10 cp --concurrency 5 s3://core-bucket/* s3://destination-bucket
Note
The cp command above specifies 10 CPUs to use for transfer to increase throughput. This value should be changed based on the number of cores available in your job if you're copying using Cheaha.
Globus is another option for transferring data using a GUI as opposed to a command line. When using Globus, you will need to set up the LTS endpoint using the credentials for the lab account. Access the LTS endpoint in both window panes and type the names of the buckets to transfer to and from. See the image below as an example

Once you've accessed those buckets, drag and drop which files need to be transferred.